Again, sorry for not updating this blog pretty often. Fili is busy with all the custom order and bazaar preparation while I just came back from three weeks vacation to the eastern part of Indonesia. Amazing place, I recommend you all to visit Flores, East Nusatenggara.
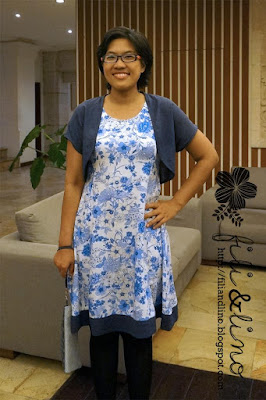
But today I'm not going to talk about my trip. I'm going to talk about the dress that I made. In the beginning, I just wanted to sew something, anything, any project. But after I saw the result, I decided to use the dress to go to my cousin's wedding reception in Bali.
Those two good looking men are my little cousins. They grew up too fast, too fast! And yup, this is the view from the wedding venue, which was exactly on the Nusa Dua beach.
It all begin when I knew that Uniqlo had three days 57% discount for the dress that I've been eyeing for some times (from Rp 299.900,00 to Rp 129.900,00!). It's a very simple one, yet I like it cause it's a princess line dress, which looks nice in my unproportional body (long torso and wide hip? Yeah, I hit the jackpot for weird body proportion). The dress used stretch materials and doesn't have any closure (you wear it like you're wearing t-shirt). This is the photo of the dress that I took in the dressing room.
Days later, I saw some youtube videos about copying a dress to make a new one, so I thought why not? I have "some" fabrics that I haven't used that I thought will look good as a dress.
After some inputs, I finally went with the top one, the blue-white flower. What I did next is to copy all the original dress panel. There are four panels in front and four in the back. But I combined the middle panels, so there are three front and three back, both sides consist of left, middle, and right panels. I used tracing paper to copy the panels.
Next, I added the seam allowance. I went with 1.5 cm (in which I'm so glad that I did. Let me tell it later).
I cut all the panels then I pin it to the fabrics, lengthwise grain.
I cut the fabric, then I decided to try my overlocker (FINALLY!) to finished the edges. It made me crazy to follow the threading instruction, but I did it!
Then I just sew all the panels together. This is the first result. I kinda like it! I thought I probably should add some sleeve, but after some discussion, I just left it like that.
However, I had a little bit of failure here. First, the original dress used stretch fabric and this one is obviously not a stretch one, eventhough it is stretching a little bit. I also think somehow I did some wrong tracing, cause the bottom of all the panels were not in fit together. Some are longer than the others. Not to mention I had to only used 0.5cm seam allowance along my breast area cause if I used 1.5 cm, it will be too snug and I couldn't put it on. Again, probably because the original dress is a stretch one.
To fix the uneven bottom seam, I had to cut all the bottom of the dress. I even had to cut some part more than 5cm(!), which made the dress much shorter than the original. So I thought, why not add some contrast in the bottom? This is the result.
I actually like the original better, but what can I say, I have to add it. I also add some binding to the arm. I was planning to add binding on the neck too but I'm just too lazy to unsew the neck (as you can see from the photo below).
And that's the dress part. But wait, not only that! I also planned to make a bolero from the same fabric that I used for the binding. After pinterest-ing for a while, I landed to this bolero tutorial. The pattern is pretty simple. I used some used A4 size envelope, open it, combine, and drew the pattern on it.
This tutorial is already included seam allowance, so I didn't have to add 1.5 cm again. I cut the pattern, pin it to the fabric (lengthwise as usual), and cut it.
The bolero was very simple and easy to sew. I used french seam to finish the side and shoulder part, and bias binding on the other edges. Unfortunately, after the bolero already finished, I felt like the back is just too wide for me. Probably if I do it next time, I will either cut the back pattern vertically around 2cm or add some darts.
To add to the dress, I also sew a matching purse.
Aaannnddd, this is the result. I know I should wear some accessories to make it look... nicer. But I didn't bring any, since pretty much the wedding occur in the middle of my trip, things like accessories were just out of my mind.
That's all about my blue dress. Next, I have some tutorial for folded pouch, so stay tuned.
Fili&Lino


Both dresses are very flattering. I'm impressed with making your own patterns. The floral fabric is very pretty.
ReplyDeleteThank you :) Honestly speaking, I'm pretty bad at making my own pattern, that's why I copy it instead of making from the scratch. And until now, I still don't really know how to draft sleeve pattern -___- Yes, the floral fabric is very lovely. Unfortunately it's not cotton but polyester, but that's ok I think.
ReplyDelete