
I was very inspired by a photo that I saw on Pinterest, it's a hand made card featured on my favorite card making website, twopeasinabucket. If you love card making (like I do), this website (and their youtube channel) is a must to visit!
So what I did exactly? I used some of my small sized scrap fabric to make a fabric flower headband. This headband is completely different from what I used to make. Since I suck at drawing, I designed it on my mind, tried it, and voila, a success (at least for me)!
Please bear in mind that:
1. I'm not a native English speaker
2. I only got 6 for my IELTS writing test
Thus, if you find any weird grammar or wording, please let me know.
Also, based on my research, Indonesian are known to be very loose about measurement, which now I realize it very much. So if this tutorial is lacking measurement, you know why.
Without further ado, here is our first tutorial!

Materials
1. Scrap fabrics (it is better if the weight is similar)
2. Medium weight fusible interfacing
3. Tulle (or any thin/transparent fabrics)
4. Fabric elastic (you can use the usual elastic, but I found this much more comfortable to wear)
5. A button
6. Thread and needle
7. Glue (nope, this tutorial is not sponsored by UHU, even though it's my most fav glue)
8. Acrylic felt
9. Used paper

Steps
1. Prepare your scrap fabric.

Arrange it on the top of the shiny surface of the fusible interfacing. Arrange the scrap fabric so it covers quite a big area (probably around 25x25 cm?). You might not use all of them, but you can make lots of interesting stuffs from it in the future! Make sure the fabrics are little bit overlapping with each other to add some interesting effect to the flower.

Iron it, then cut the area with scrap fabrics on it. Iron it again to make sure all of them are sticky enough.

2. Take a used paper (anything!), fold it half vertically, draw a half petal pattern on it, then cut it. I advise to make a petal pattern with a sharp pointed in both ends, not like my first petal pattern.


3. Draw the pattern on the back of the lined scrap fabrics, then cut it. You can only draw one pattern then fold the fabrics few times, so you can few petals at once. You can also become a fuzzy cutter (the term that my Academic advisor used when she taught me how to do patchwork), draw the pattern in certain part of the fabrics to get a certain pattern.

In this tutorial, I cut 16 petals, but you can have as much as you want.

4. Combine two petals into one by putting the wrong sides together, then sew it with 3-4mm seam allowance.


If you don't have a sewing machine, you can glue them back to back.
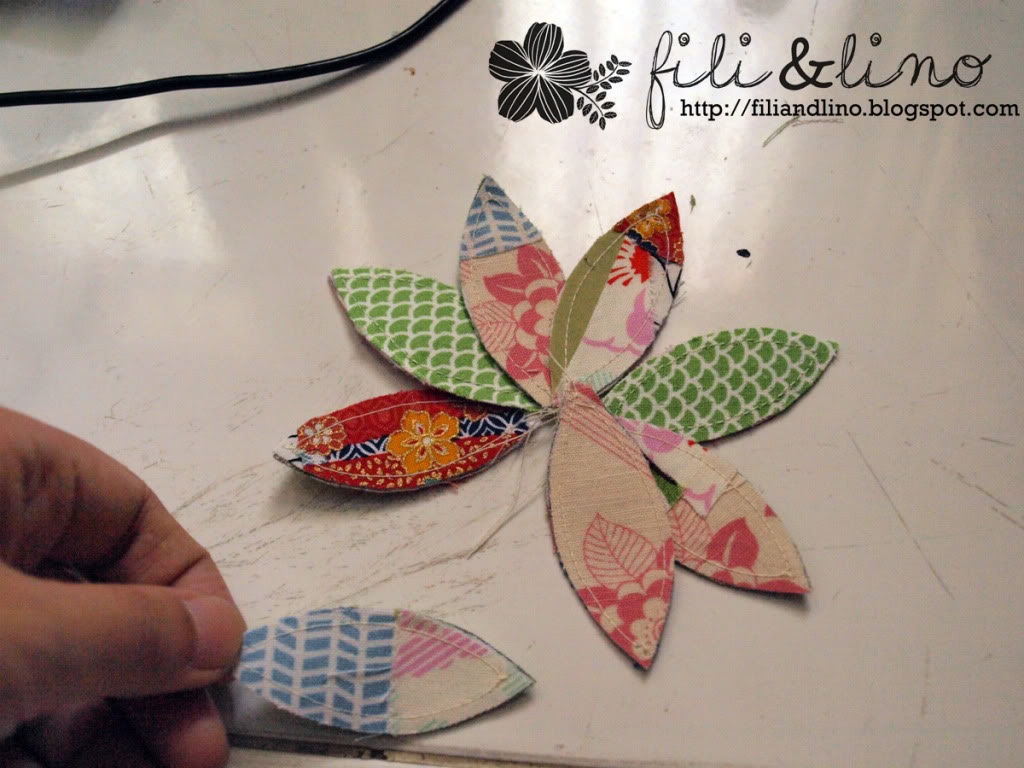
5. Cut the excess threads on your petals. Arrange the sewn petals into a flower. Since I use an eight petals flower, it means the 1st petal is in line vertically with the 5th, the 2nd with the 6th, and so on. Arrange the petal with one of the side overlapping with the next petals.

If you already sure about the position, glue them all by putting the glue to the overlapped area only.

And here is the fabric flower:
Front side

Back side

7. ATTENTION: I did something wrong with the steps, so sorry if the photo is not similar with the direction.
Since I thought the flower is too plain, I added some tulle to it.
Cut a tulle with length as tall as your petal or more and wide that can cover the whole flower circumference. In my case, the wide is around 45cm.

8. Fold the tulle every 2-3cm wide wise, then cut an arch in the top of the folded tulle.


9. Open it again, and then loosely hand sew the tulle in the opposite part of the arch (as you can see, my tulle in the photo didn't have arch/small scallop because I sew it first before I cut it >< It supposed to be cut first then sew it!)

10. Pull the thread in both ends, then tie more than one knots to secure the thread.


You can cut the excess thread, but DO NOT cut the thread with the needle on it.
Pull the needle through the middle part of the back side of the fabric flower.

11. Take the button with coordinating colour with your fabric flower. Add some glue around the little holes.
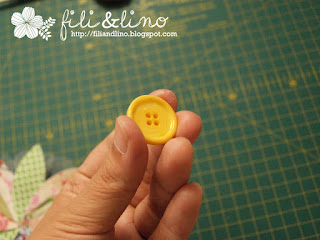
Pull the needle through one of the button holes, then sew the button just like usual. I added some glue just to make sure the button position is firm enough. This is what your fabric flower will look like

12. Now to the last part: the headband! Cut the elastic with the length of your head circumference. When you measure your head's circumference with the elastic, stretch it a little bit so the length of the elastic in the normal condition is shorter around 3-4cm than your head's circumference.

13. Meet both of the ends and glue it together.

Sew the glued end of the elastic to the flower.

Cover the sewn part with an acrylic felt. Cut an acrylic felt in round shape with size that covers all the "ugly" part of the headband.

Aaannd, voila! You have a new headband.


If it's too big, you can always make a smaller version using smaller and fewer petals. You can also use the petals as an applique to your other stuff such as a bag, clothes, etc.
And that's all from today.
Lino
So what I did exactly? I used some of my small sized scrap fabric to make a fabric flower headband. This headband is completely different from what I used to make. Since I suck at drawing, I designed it on my mind, tried it, and voila, a success (at least for me)!
Please bear in mind that:
1. I'm not a native English speaker
2. I only got 6 for my IELTS writing test
Thus, if you find any weird grammar or wording, please let me know.
Also, based on my research, Indonesian are known to be very loose about measurement, which now I realize it very much. So if this tutorial is lacking measurement, you know why.
Without further ado, here is our first tutorial!

Materials
1. Scrap fabrics (it is better if the weight is similar)
2. Medium weight fusible interfacing
3. Tulle (or any thin/transparent fabrics)
4. Fabric elastic (you can use the usual elastic, but I found this much more comfortable to wear)
5. A button
6. Thread and needle
7. Glue (nope, this tutorial is not sponsored by UHU, even though it's my most fav glue)
8. Acrylic felt
9. Used paper

Steps
1. Prepare your scrap fabric.

Arrange it on the top of the shiny surface of the fusible interfacing. Arrange the scrap fabric so it covers quite a big area (probably around 25x25 cm?). You might not use all of them, but you can make lots of interesting stuffs from it in the future! Make sure the fabrics are little bit overlapping with each other to add some interesting effect to the flower.

Iron it, then cut the area with scrap fabrics on it. Iron it again to make sure all of them are sticky enough.

2. Take a used paper (anything!), fold it half vertically, draw a half petal pattern on it, then cut it. I advise to make a petal pattern with a sharp pointed in both ends, not like my first petal pattern.


3. Draw the pattern on the back of the lined scrap fabrics, then cut it. You can only draw one pattern then fold the fabrics few times, so you can few petals at once. You can also become a fuzzy cutter (the term that my Academic advisor used when she taught me how to do patchwork), draw the pattern in certain part of the fabrics to get a certain pattern.

In this tutorial, I cut 16 petals, but you can have as much as you want.

4. Combine two petals into one by putting the wrong sides together, then sew it with 3-4mm seam allowance.


If you don't have a sewing machine, you can glue them back to back.
5. Cut the excess threads on your petals. Arrange the sewn petals into a flower. Since I use an eight petals flower, it means the 1st petal is in line vertically with the 5th, the 2nd with the 6th, and so on. Arrange the petal with one of the side overlapping with the next petals.
If you already sure about the position, glue them all by putting the glue to the overlapped area only.

And here is the fabric flower:
Front side


7. ATTENTION: I did something wrong with the steps, so sorry if the photo is not similar with the direction.
Since I thought the flower is too plain, I added some tulle to it.
Cut a tulle with length as tall as your petal or more and wide that can cover the whole flower circumference. In my case, the wide is around 45cm.

8. Fold the tulle every 2-3cm wide wise, then cut an arch in the top of the folded tulle.


9. Open it again, and then loosely hand sew the tulle in the opposite part of the arch (as you can see, my tulle in the photo didn't have arch/small scallop because I sew it first before I cut it >< It supposed to be cut first then sew it!)

10. Pull the thread in both ends, then tie more than one knots to secure the thread.


You can cut the excess thread, but DO NOT cut the thread with the needle on it.
Pull the needle through the middle part of the back side of the fabric flower.

11. Take the button with coordinating colour with your fabric flower. Add some glue around the little holes.

Pull the needle through one of the button holes, then sew the button just like usual. I added some glue just to make sure the button position is firm enough. This is what your fabric flower will look like

12. Now to the last part: the headband! Cut the elastic with the length of your head circumference. When you measure your head's circumference with the elastic, stretch it a little bit so the length of the elastic in the normal condition is shorter around 3-4cm than your head's circumference.

13. Meet both of the ends and glue it together.

Sew the glued end of the elastic to the flower.

Cover the sewn part with an acrylic felt. Cut an acrylic felt in round shape with size that covers all the "ugly" part of the headband.

Aaannd, voila! You have a new headband.


If it's too big, you can always make a smaller version using smaller and fewer petals. You can also use the petals as an applique to your other stuff such as a bag, clothes, etc.
And that's all from today.
Lino
pake Indonesia aja komennya gpp??..:D
ReplyDeletekira2 klo bahan kattunnya diganti sama silk atau paris atau hero..bisa gak yah?...*mikir*
Bisa aja siy, tapi:
Delete1. Motif kain paris/hero/silk ga sevariatif katun biasa/katun Jepang.
2. Mereka lebih lemas dan tipis dibanding katun biasa/jepang, ga yakin mereka akan cukup solid untuk bisa berbentuk, walaupun dilapis kain keras
3. Kurang yakin apakah kain-kain tersebut bisa menempel dengan cukup solid ke kain keras.
Sekian :)
Linda vou usar nas minhas bolsas,obrigada
ReplyDelete